by David J. Watkins
Astrophotography
Welcome to the WatWare Astrophotography Page!
This page is where I share what I have learned about Astrophotography in the short time that I have been engaged
in the hobby. These pages are geared toward those starting out in digital astrophotography, though the image
processing page may have something to offer the more advanced imager.
The Astrophotography page is divided into three sections in addition to this introduction page:
- Astrophotography 101: Beginning Astrophotography - what to shoot and what equipment is required.
- Aquiring Astro Images: More on equipment, kinds of images required, how to aquire them.
- Astro Image Processing: Software and how to process astrophotography images.
Use the three links at the top of the page to navigate to the different sections. Below is an introduction on how I became interested in astrophotography.
How I got started:
I am relatively new to astrophotography, this all took off for me in September of 2012. I don't really
consider myself a "true" ameteur astronomer. For the most part, I enjoy the hobby for
the "pretty pictures" that I can aquire. Even after several years, I still don't know most of
the constellations! When I started, I could locate Orion, Polaris (North Star), the Big Dipper, and the bright
planets, that was it! Today I can locate several more objects, but I still rely on a good alignment and the
computer to help find the objects.
Prior to 2014, all of my images were aquired with an "unmodified" DSLR, Canon 5D MarkII, and the following camera lenses;
Canon EF 600mm f4L IS, Canon EF 17-40mm f4L, Canon EF 50 f1.2L, Canon 70-200mm f2.8L IS.
When I started this page I did not even own a telescope! In May of 2013, I purchased a Celestron EdgeHD 8 inch Schmidt
Cassegrain telescope. In 2014 I began exploring autoguiding and purchased a monochrome 1.2 megapixel QHY5L-II camera
for autoguiding. I quickly learned that I could also use the QHY5L-II as a video camera and acquire much better planetary
images than I could with the Canon! I also ended up purchasing a Coronado Solar Max II 60 dedicated solar
telescope in 2014. Again, the QHY5L-II excels at solar images much better than the Canon. In late 2015 I
purchased a dedicated solar/lunar high frame rate camera from ZWO, the ASI174MM. The ASI is a monochrome 2.3 megapixel
camera that captures frames at 128fps at its full resolution! The QHY5L-II will only capture at 15fps full
resolution. Since these are monochrome cameras, I also purchased a LRGB filter set and a filter wheel for capturing the
planets in color.
In 2015, I purchased an Orion f/5 120mm refractor telescope for viewing while I was imaging on the Celestron.
In 2016, I made the switch to an ATIK460EX CCD camera. The 460EX is a cooled 6MP monochrome camera. The sensor
is much more sensitive for capturing light than the DSLR. Capturing nebula with the CCD is a much more rewarding
experience! I also aquired two more cameras specifically for capturing planets and planetary nebula. ZWO
ASI178MM 6MP cooled monochrome, and the ZWO ASI178MC 6MP color camera. The sensor size and pixel size is much smaller
than on the DSLR and the ATIK. This makes them ideal for planetary images as well as small planetary nebula. In addition
to the LRGB filter set, I also aquired a set of narrowband filters from Orion. Ha (Hydrogen Alpha), OIII (Oxygen 3), and
SII (Sulfur 2). With the narrowband filters I can image faint nebula during the full moon even in light polluted skies!
After acquiring the narrowband filters, I found that the Orion 120mm refractor made an excellent scope for imaging using them.
To shoot with an even wider field of view, in December of 2017, I purchased a Stellarvue SV70T Triplet refractor telescope. Then in
2018 I replaced the Orion 120mm f/5 with a Stellarvue SVR102T f/7 Triplet refractor.
The early years:
I was always fascinated with deep space objects as a kid. I can remember seeing photos of the the Horsehead
Nebula and Ring Nebula in school books and thinking it would be really cool to see those through a telescope.
I did have a couple "toy" telescopes when I was young and I would point them at stars, look and think "
it looks like a dot with out a telescope and it looks like a dot through a telescope, must have to work for NASA
to see anything more". I did look at the moon a few times and could see
craters, cool! I figured you had to have a really powerful telescope to see anything impressive. I inherited a
very old spotting scope from my grandfather when I was 16 or so, I never really used it much, it looked like a very small
telescope, but it did have screw on eyepieces. One night, in 1983, while watching
the weather forecast on television, the weatherman mentioned that Saturn was visible in the southern sky. It was a clear night
so I took the spotting scope out and pointed it toward the bright object near the direction that the weatherman
said to look. I got the bright object
in view, adjusted the focus and... I felt like all the air was instantly sucked out of my lungs! It took my breath
away! I couldn't believe my eyes, it was definitely Saturn! I could see a planet
with a ring around it! Sure it was really tiny through the spotting scope, but I was still amazed and completely
blown away that I could see Saturn! Later I found Jupiter and could see four of
its moons. Through the years I often thought about getting a telescope but it just never became a priority.
Sometime in 2003 I became interested in birding and ended up buying a good quality spotting scope, an 85mm Zeiss
Diascope. Angela (my wife) and I would ocassionally take it out to stargaze in addition to birding. One night at
Mammoth Hot Springs in Yellowstone it was a clear night and we could see hundreds of stars, many more than we had ever
seen in Ohio. We would just move the scope around and be amazed at the number of stars that could be seen. We
had no idea what we were looking at other than lots of stars.
In September of 2012 we took a trip out west to visit Zion, Arches, and Canyonlands National Parks. One evening
I decided to capture some sunset photos at upheaval dome in Canyonlands. On the way back to the hotel, we
decided to stop and stargaze as the sky was pretty clear and it was beginning to get dark. We pulled
into the parking lot at Whale Rock and set up the spotting scope. After we looked around in the scope awhile,
I had remembered seeing photos of star trails and was thinking that this might be a good opportunity to shoot some
stars to see what I get. I had no clue how to do it or even where to begin. So I decided
to just take some test shots while she gazed through the scope.
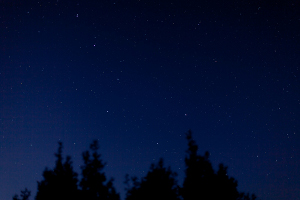
One of my first test shots was of the big dipper. I remember hearing to shoot star trails you should open the
lens full wide open. So I decided to use my 50mm lens as it would open up to f/1.2. I set the
ISO to 100 and shot for 13 seconds for this capture. I took about 5 other exposures, 13 seconds being the
longest and the best exposure, the others were just too dark.
Focusing - again, no clue of what I was doing, I just racked the indicator to infinity on the lens.
I played around a bit trying to get stars to trail, but I could only expose for 30 seconds without using the bulb option. I did not get very much trailing with 30 seconds. It was dark and I had no way of timing the bulb mode exposure other than holding a flashlight on my watch. So I went back to gazing with the spotting scope as there was this "annoying strange cloud" off to the southwest and I didn't want that to ruin any star trail shots. After gazing a bit with the scope, I realized that "Annoying Cloud" was really a dense packed band of stars! It hit me right then! I remember people asking me in the past "have you ever seen the Milky Way". I always thought, we're in the Milky Way, most of the stars you see are in it, what's the big deal? It was at this point that I realized what "seeing the Milky Way" really meant!
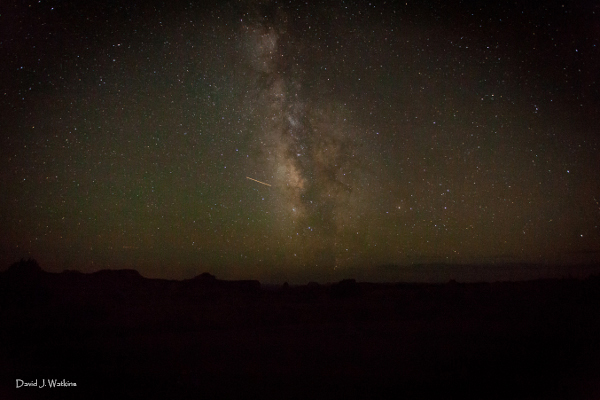
I threw on my 17-40mm f/4.0 lens to get a 17mm wide field
of view. I exposed this shot for 15 seconds and at ISO 12800. And again focusing consisted of racking
the lens to the infinity indicator. No, ISO 12800 is not where you want to shoot for real photos, but
remember I'm playing and experimenting here!
Another thing I learned that night was how many planes there are in the sky! If you shoot a really wide
field of view it is extremely difficult to not have a plane move through your image! Notice the light trail
in the middle of this image.
Satellites are another thing to expect to slowly move across your night time images.
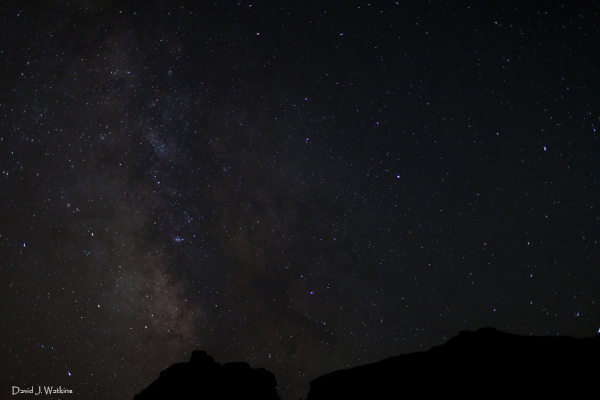
I was so blown away that night in Canyonlands that I decided to try shooting the following night at
Arches National Park. So after dark the next night we parked at The Organ/Court House Towers.
To get the southern band of the Milky Way, I shot toward the
backside of the Park Avenue formations. I just started playing again with exposures and ISO. Also tried hitting
some of the rock formations with a flash light to illuminate the rock with the stars behind it.
This shot was with the 50mm
lens at f/1.2, 10 seconds at ISO 800. I got rid of the orange glow with lightroom by changing the white balance, the
orange glow was from the lights in Moab, UT. about 5 miles away.
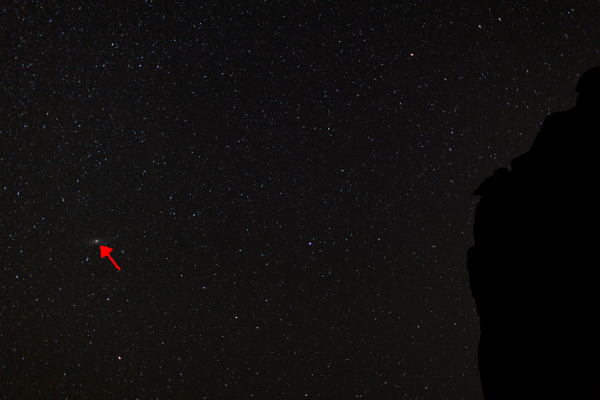
I didn't really notice until I was going through these photos after the trip, that I was also capturing galaxies, nebulas, star clusters, etc. This photo I noticed the fuzzy dot on the left above the arrow. I thought was that a galaxy? So I found a free program Stellarium (http://www.stellarium.org/) that would plot the night sky. I set the location and the date to when I was at Arches and compared my photos to the sky plot and sure enough, I shot the Andromeda Galaxy! I thought, if I could get that with a 50mm lens, just think what it would look like through my 600mm lens! I was hooked!
So it's called Astrophotography:
Following our vacation I was checking the schedule for monthly presentations at the Cuyahoga Valley Photographic Society meetings and noticed that for the October meeting a local astrophotographer, George Gajdos was going to give a presentation. What perfect timing! The star trail thing was no longer as interesting as shooting deep space objects to me. I was beginning to realize that I wanted an equatorial mount for longer exposures. So the presentation would be perfect to find out all about astrophotography from somebody who has been doing that for awhile. After the presentation I did get the chance to ask questions and speak with George for a bit. His recomendation was to start small, don't start with a big heavy telescope that you have to transport or carry around. I asked if he recommended any one equatorial mount. He told me to check out the Orion website (www.telescope.com).
I think the biggest thing I got out of his presentation is that mastering astrophotography of deep space objects has a very long learning curve. It is much more involved than pointing up at the sky and shooting away. Most deep space objects require exposures of two hours at the very least! (some of my current nebula images contain 15 hours worth of exposures!) Digital sensors are much more sensitive than film and will not handle single exposures of even an hour. Noise is a problem with digital sensors. Equatorial mounts do not track perfectly, they will drift over time, in fact you have to have perfect polar alignment to get even 3 minutes of tracking before stars begin to elongate. Many astrophotographers use autoguiders for more accurate tracking. An autoguider consists of another small telescope with an image sensor that is aligned with a guide star. As the guide star drifts, the autoguider will send the correction signals to the tracking mount. That process is usually controlled by software so a laptop is required for most autoguiding systems. Autoguiders can mistake hot pixels for stars and try to guide on them!
The good thing about shooting objects in the night sky is that most of the objects will be there for a very long time. So you don't have to jump full into astrophotography all at once. I started out with just taking wide angle shots with a tripod, camera, and lens. Later I added a GEM mount to use with my super telephoto lens. I worked this way for a while before I bought a telescope. I imaged with the telescope for a year before I bought an autoguider camera. It is probably better to progress slowly so you learn and understand how to use what you have before you advance to the next level. It is good to experiment with what you have first, then take the time to do some research on what equipment will help you achieve what you are looking to do. I've read many stories where people have jumped right in and bought a bunch of equipment and then found out what they bought will not do all what they wanted. So it's best to take it slow, try things, learn, and research. That way you only end up with what you will need, and not a bunch of expensive under-performing equipement. I have to say that I have not ended up with any equipment that is not useful to me.
Next Astrophotography 101