by David J. Watkins
Beginning Astrophotography - Emission and Reflection Nebula
1) Astrophotography 101 2) Wide Angle 3) The Moon 4) Large Nebula 5) DSO's 6) Planets 7) The Sun
Imaging Large Nebula:
Reflection Nebula are dust and particles reflecting light from a nearby star. They tend to appear
as a blue haze and do not typically emit any light on their own. Reflection nebula are typically easier to
image than Emission Nebula. They tend to be brighter and require a little less exposure time.
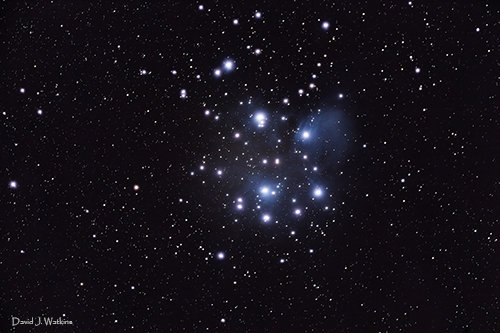
The Pleiades Cluster (Messier Object M45) is a reflection nebula. This is a stack of 8 images that spans about
24 minutes total. These were taken with my Canon 5DMarkII and 600mm lens on a GEM mount.
Emission Nebula are probably the most difficult of astrophotography images to aquire. Emission
Nebula are typically
very large, some as large as 3 degrees across! They can be captured using a lens with a focal length
as short as 200mm! The difficult part is that they are so faint that they require exposures of several
hours or more. Exposing for this length of time requires a tracking mount.
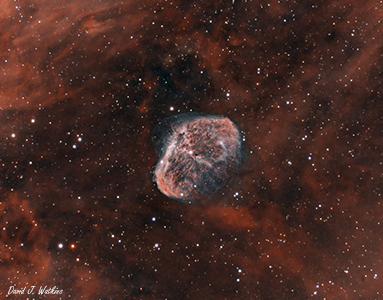
Monochrome or grayscale CCDs excel at capturing emission nebula, especially when used with narrowband filters. The red in
the crescent and surrounding nebula consists of Hydrogen gas. Eight (8) exposures of 30 minutes each with the
Hydrogen Alpha (Ha) filter were used for this image (4 hours). The fine blue-green detail was captured using a 3 nanometer
Oxygen III (OIII) filter and 14 exposures of 30 minutes each were used (7 hours). The two images were combined as a single color
image and then combined with a LRGB image for the star color. Each L,R,G,B channel consisted of sixty 30 second images (2 hours total).
Total exposure time for the image was 13 hours. A DSLR would have to expose for a much longer time and still would not likely
capture the hydrogen detail since the IR cut filter would block much of the Ha wavelength.
One of the issues with emission nebula is that they consist mostly of hydrogen gas and emit most of their light in the red or Ha (Hydrogen Alpha) spectrum. Commercial digital cameras both point and shoot, and DSLRs, contain an IR (infrared) filter in addition to a bayer pattern filter placed over the sensor. Both filters block a portion of the light from being recorded by the sensor. The IR filter blocks a good percentage of the Ha spectrum light from being recorded. Using a DSLR, you can increase the exposure time to gather more light, but you will most likely not be able to record the full color spectrum. It is at this point that I will stop mentioning point and shoot cameras. As you will see below that even the best DSLRs have their limitations. The usefulness of point and shoot cameras for astrophotography really falls off once you begin to take very long exposures or stacking images.
DSLR's specifically for Astropohtography:
Canon does make a DSLR camera with out the IR filter that they use on their standard digital cameras. Their D60a model is specifically manufactured for astrophotography. There are also companies that will modify your DSLR by removing the IR filter and replacing it with a Baader filter specifically for astrophotography. Note that the Baader filter is not the same as the Bayer (RGGB) filter. The modification can be performed for a few hundred dollars. The Canon D60a is about $1500. From what I have read and seen comparisons, the modifications with the Baader filters tend to yield better results than the D60a. The D60a can be used to take daylight photographs in addition to astro images. Though you probably have to play with the white balance in post processing to correct for the slight color imbalance. Once a DSLR is modified with a Baader filter, it becomes an astrophotography camera and is not well suited to daylight photography. The modification affects the focus plane, so autofocus is affected. But you will never use autofocus for astrophotography anyway. The Baader filter modified cameras also produce a heavy red color cast to daylight images. Using a modified DSLR or the Canon D60a will collect more of the light in the Ha range and produce a much better result on emission nebula than using an un-modified DSLR.
Bayer Filter (RGGB):
A bayer filter consists of a red, blue, and two green filters over each 4 pixel array on the sensor of the camera. That means that only 1/4 of the pixels on a digital camera will record colors in the red spectrum. Likewise 1/4 of the pixels will record colors in the blue spectrum, and 1/2 of the pixels will record greens. All color cameras contain a bayer pattern filter or a variation of it to record color.
Grayscale CCD Cameras:
Another option that produces the best results for emission nebula and other DSOs, is to use a
camera with a grayscale (no color) CCD sensor. To use a grayscale CCD, you first capture images with
a luminance filter. The luminance image is brighter because just about all of the light that hits the
sensor is recorded. Next the luminance filter is removed and 3 additional sets of images each are taken with
a red filter, a green filter, then a blue filter. The L (luminance), R (red), G (green), and B (blue) images are
combined to produce a single color image. That single image creates a better quality image because each pixel records
all three colors plus luminance. The downside to imaging combined LRGB is the amount of time involved.
Instead of collecing just one set of images of a nebula using a DSLR, you now have to collect four sets of images of
that nebula. Grayscale CCD cameras, sometimes called Black and White, or Monochrome cameras
tend to be very expensive, especially for higher resolution cameras. Typically those types of cameras will include
a cooling system to keep the temperature low on the sensor and electronics. Cooling the electronics
reduces the noise output of the sensor.
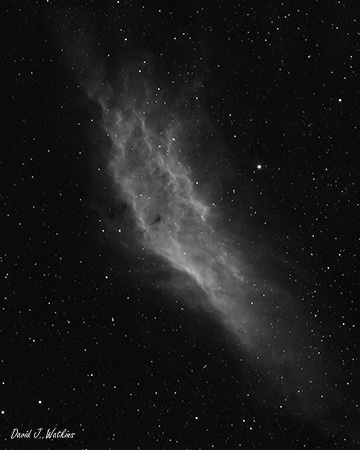
Another advantage of monochrome/grayscale cameras is the ability to use narrowband filters to block all wavelengths of light
except the wavelengths emitted by the nebula. This image of the California nebula was taken using a Hydrogen Alpha filter
and ATIK 460EX monochrome camera to bring out the detail of the hydrogen gas. This image consists of five 30 minute exposures or
2.5 hours.
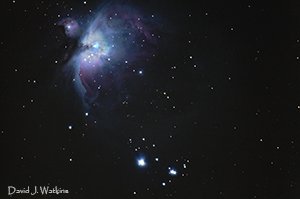
While most emission nebula are very faint and difficult to capture, there are some emission nebula that are
bright enough to be easily captured. The Orion Nebula (Messier Object M42) is one such object.
I shot this image on an un-modified DSLR with a 600mm lens and a 2X telextender (1200mm). It consists of several 30
second images stacked together with software for a total exposure time of less than 5 minutes.
Using a modified DSLR or LRGB imaging would reveal much more detail than the image that I captured with the
un-modified DSLR. Aquiring more images from the DSLR for a longer total exposure time would also reveal more detail.
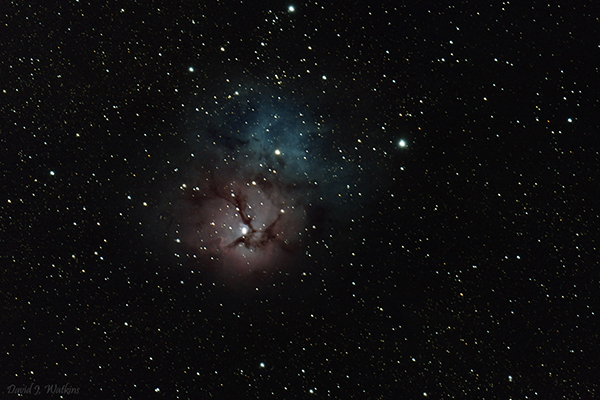
The Trifid Nebula (Messier Object M20) contains both a reflection nebula and an emission nebula. This image was taken with my Canon 5DMarkII at ISO3200 on the 8 inch Celestron HD Edge telescope. I forgot my Windows Tablet, so I could not autoguide. I limited the images to 2 minutes each and took a total of ten images for this stack before the moon appeared over the rocks at Arches National Park and washed out the sky.
Stacking Images:
Since digital camera sensors will not handle extremely long exposures, astrophotographers will capture many shorter exposures and use software to stack or add the photos together to create a single exposure that is equivalent to the total time of all the stacked images. The shorter exposures can be as short as 30 seconds or as long as 20 minutes. Stacking images also reduces random noise artifacts that typically affect dark images. Stacking involves aquiring more images than just the images of the nebula. Typically dark frames, bias frames, and flat frames are aquired. This will be discussed in greater detail in the Astro Imaging and Astro Image Processing sections.
Focus:
In case you skipped the page on Wide Angle astrophotography, I will repeat the topic of focusing. Focusing is one of the most important and time consuming tasks in astrophotography. In astrophotography, perfect focus an aboslute necessity. So here it is again!
You will want to focus at infinity to get sharp pin point stars. In the old days with manual focus lenses, you could just rack the focus to the infinity setting. With today's autofocus lenses, they will turn past infinity. That doesn't sound possible does it? The reason for this is so that the motors in the lens do not slam against a hard stop when autofocusing. When focusing for astrophotography, you will want to switch your lens to manual focus. Autofocus just does not work in the dark or on tiny objects or very faint objects. You cannot autofocus on a star! The only sky object you can focus on at night is the moon, so you need to get used to focusing manually. Focusing on stars is like learning a new skill. There are focusing aids available for astronomy, mostly for telescopes.
The method of focus that I use is the live view mode on the camera. You will need to find a bright star to begin. You will also want to set the ISO on the camera to its highest setting possible (ISO 6400, 12800, or 25600). Then set the mode to bulb mode or the "B" setting on the camera. Zoom in on the star at 5x or 10x in live view mode if your camera has that feature. Then rack the focus back and forth until the star is the smallest pin point that you can get. The star will swell in size the more out of focus that you are. Once the star is the smallest size that you can get it, you are in focus. As long as you do not disturb the focus, you should not have to re-focus to shoot other stars. All stars, galaxies, planets, nebula, etc are at infinity as far as the lens is concerned. Unlike focusing on a subject in the daylight, focusing on a star can take a very long time, so don' be surprised if you spend 15 minutes or more achiveing focus! One way to cheat this process is to use the moon to focus on if it is out. Most likley you will be shooting stars or the Milkyway when there is no moon to take advantage of the dark sky, so don't count on the moon to be able to focus on.
Review Of Recommended Equipment:
- Equatorial Tracking GEM Mount
- Autoguider system for tracking mount
- Telephoto lens 200mm to 800mm or shorter focal length telescope
- DSLR modified, Grayscale CCD/CMOS with RGB filters or narrowband filters, or Color CCD/CMOS camera.
- Software for stacking images.
Equipment you can get away with:
- DSLR unmodified - requires longer exposures and may not capture all the red of Ha color spectrum.
- Can get away with no autoguider for eposures of 30 seconds. With perfect polar alignment 2 minute exposures.
- Longer focal length telescope with a focal reducer.
1) Astrophotography 101 2) Wide Angle 3) The Moon 4) Large Nebula 5) DSO's 6) Planets 7) The Sun